Authentication Overview
The Developer Platform uses OAuth 2.0 and JWT for authentication.
OAuth 2.0 is an industry-standard protocol for authorization that lets applications access limited user data or perform actions on behalf of a user without exposing login credentials.
JWT (JSON Web Tokens), offers a lightweight and secure way to transmit verified identity and authorization data between systems.
Supported authentication flows
The Developer Platform supports two OAuth 2.0 flows to cover different integration scenarios: machine-to-machine and named user authentication.
Machine-to-machine authentication (client_credentials)
Use case: for backend or system integrations where no user is involved.
Overview
Creating a Client Configuration
Manage Resources
Constraints and Data Filters
Steps to create a Client Configuration
Client Credentials
Token Lifecycle
Named user (authorization code flow)
Use case: for applications acting on behalf of individual users.
Overview
When to use
How it works
Registering an App for Named User Authentication
Authorization Code Flow (with PKCE)
Prerequisites
Preforming the flow
Scopes and Access Control
Troubleshooting
Security Checklist
Machine-to-machine authentication (client_credentials)
Overview
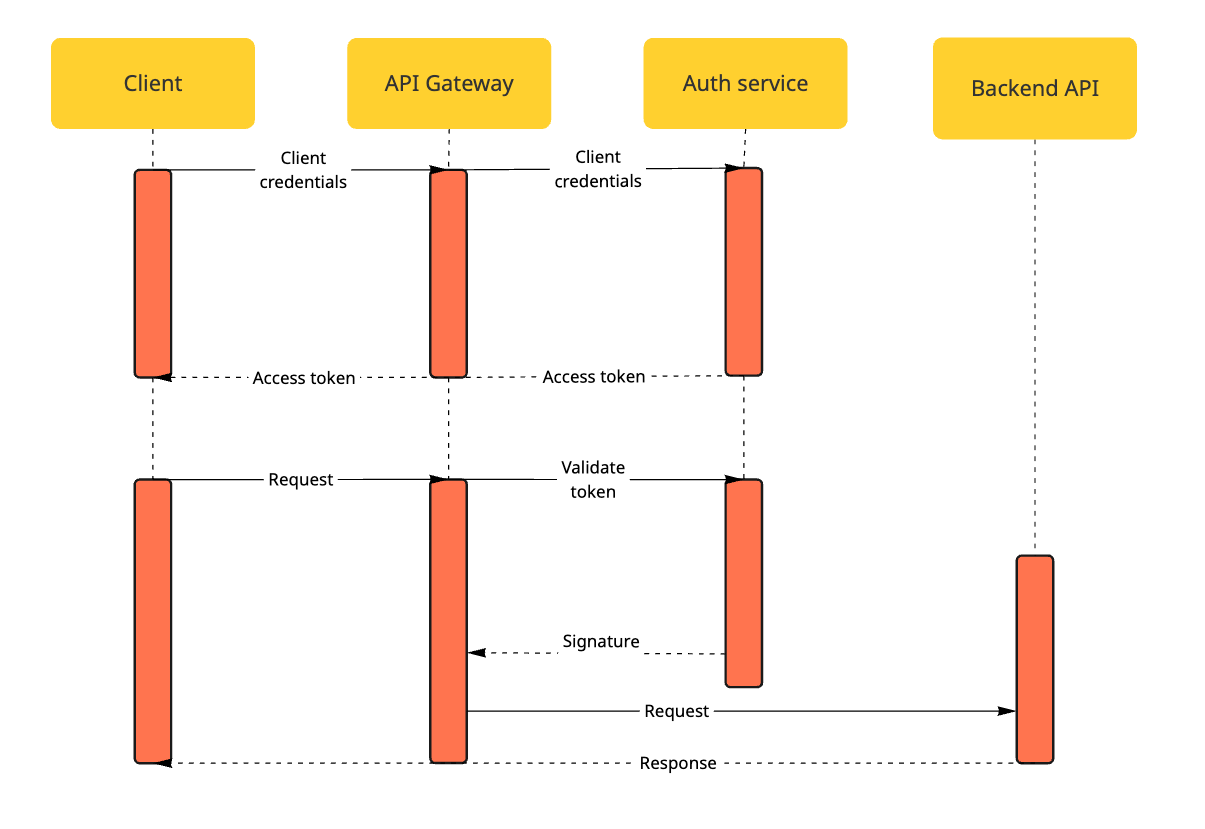
The Client Credentials Grant is used for integrations between CatalystOne and other systems (headless integrations). In this flow, an API client authenticates using a Client ID and Client Secret to obtain an access token (JWT).
This flow is ideal for system integrations, for example, where CatalystOne is connected to another system and runs automated data exchanges.
Creating a Client Configuration
Only users with the “Manage Integrations” permission can create or manage clients.
To Check setup is possible go to:
Refreshed: System Administration → (Roles and Permissions) User groups and permissions
Classic: Administration → (Organisation, Users and Groups) Update group permissions
→ Scroll down to Global settings, and toggle the “Manage Integrations” on

Manage Resources
The Manage Resources section defines the scope and boundaries of data access granted to a client.
A resource refers to an API available on the CatalystOne Developer Portal that a client application can interact with through OAuth 2.0.
Each permission corresponds to a scope, which determines what level of access the client has to that specific API.
These scopes are included in the JWT issued to the client during authentication.
Each API defines its own available scopes and their meanings.
A client must have at least one scope assigned to gain access to an API.
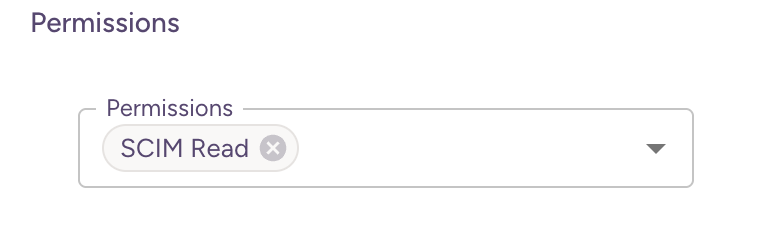
Example:
Permission: SCIM read
Scope:
scim.readDescription: Allows the client to read data from the SCIM API.
Constraints and Data Filters
Some APIs support constraints are fine-grained filters that restrict the subset of data accessible to a client.
Constraints are especially useful for user-centric APIs, where access can be limited based on groups, departments, or similar criteria.
Do not include constraints in the token request.
They are enforced by the Authorization Server and/or Resource Server at runtime, based on the client’s configuration.
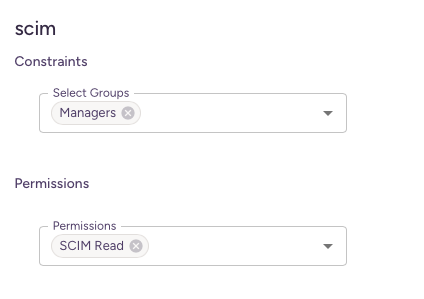
Example:
If a client has the scope scim.read and a constraint limiting access to users in the Managers group,
the client can only read users who belong to that group.
In practice:
The Data Resource Configuration section in the UI defines which APIs a client can access.
Manage Resources controls how broad or narrow that access is — through a combination of scopes and constraints.
Steps to create a Client Configuration
In CatalystOne, go to Manage Integration → Client Configuration.
Create a new configuration and provide:
Name – human-readable identifier.
Category – describes the integration purpose.
Description – optional details for later reference.
Define Resources (APIs to access), Scopes, and Constraints (using the concepts explained above).
Generate Client Credentials:
Client ID – unique identifier used for authentication.
Client Secret – private key used to request tokens.
⚠️ Important: The Client Secret is shown only once. Copy and store it securely; once regenerated, previous secrets are invalid.
Client Credentials
In the Client Credentials section of the left-hand menu, you can generate secrets for your client.
The Client ID is displayed in UUID format.
Click Generate Secret to create a new client secret.
When successful, the system returns a random string — this is your Client Secret.
⚠️ Important: The Client Secret is displayed only once at creation.
Copy and store it securely (e.g., in a password vault).
If a new secret is generated later, the old one becomes invalid immediately.
Use the Client ID and Client Secret when performing the OAuth 2.0 Client Credentials Flow to request a JWT token.
The issued token has a time-to-live (TTL) of 1 hour.
The expiry period is not currently configurable.
Token Lifecycle
Access tokens are valid for 1 hour.
Each authentication request issues a new token.
Existing tokens remain valid until they expire.
Token Request Example
Token Endpoint
POST https://api.catalystone.io/oauth2/tokenContent-Type: application/x-www-form-urlencodedAuthorization: Basic <base64(client_id:client_secret)>grant_type=client_credentialsscope=<space-separated scopes>
grant_type is client_credentials
scope is a space-separated list (e.g., scim.read manage.subscriptions)
cURL example (your URL + example scope)
curl --location 'https://api.catalystone.io/oauth2/token' \--header 'Authorization: Basic <BASE64(client_id:client_secret)>' \--form 'grant_type="client_credentials"' \--form 'scope="manage.subscriptions"'
Note: <BASE64(client_id:client_secret)> this means, the client id and secret are appended by : and Base64 encoded, and send in Authorization Header with String attached to it Basic. This is a standard by OAuth2 Protocol.
We validate the same request shape throughout tests (Basic auth header + form grant_type and scope)
Named user (authorization code flow)
Overview
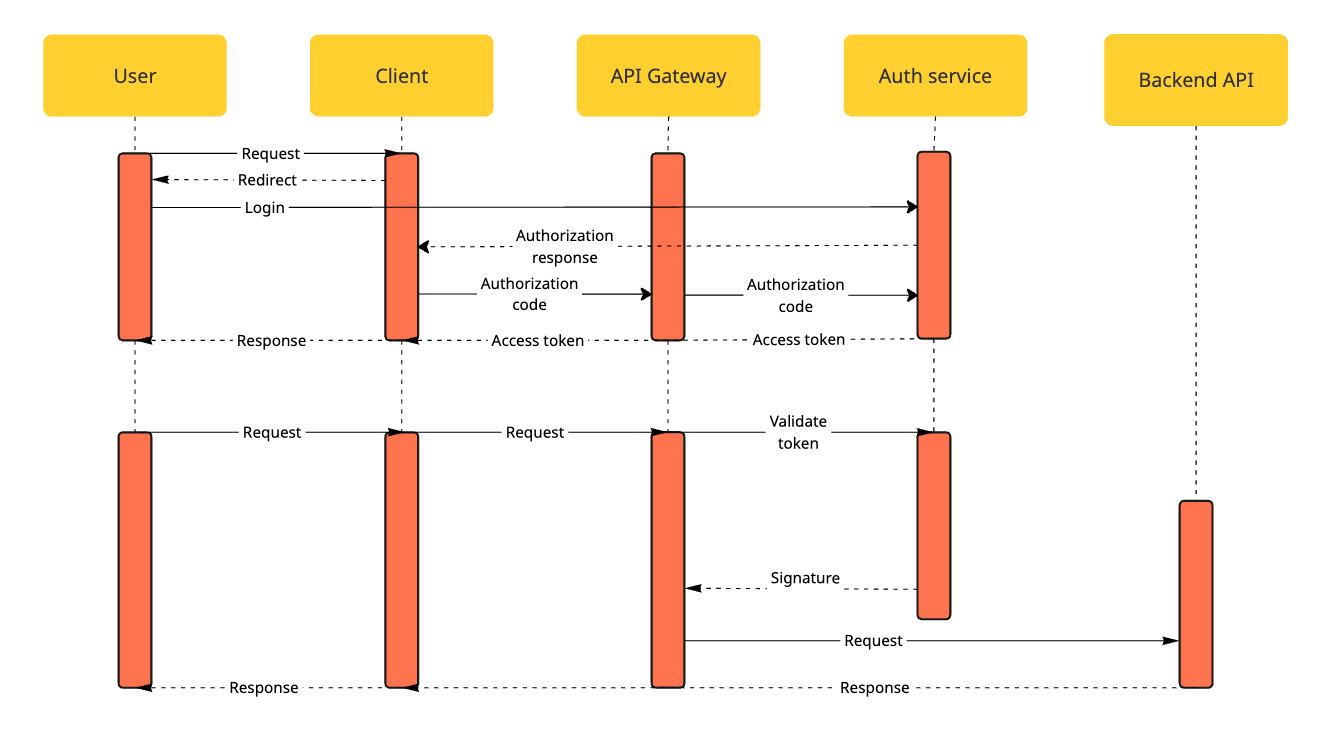
The Named User Authentication flow enables applications to act on behalf of individual users.
It uses the OAuth 2.0 Authorization Code Grant with PKCE (Proof Key for Code Exchange), the same mechanism used by Single Sign-On (SSO) providers such as “Login with Google” or “Login with Microsoft.”
In CatalystOne, this flow allows external applications or integrations (e.g., web apps, Slack bots, or Teams connectors) to authenticate users securely using their CatalystOne credentials.
Once authenticated, the application can access CatalystOne APIs within the user’s own permission scope.
When to Use
Use Named User Authentication when:
Your application needs to perform actions as a specific user.
The user’s permissions and visibility should determine what the integration can access.
You’re integrating CatalystOne into another platform (e.g., Slack, Teams, or a custom web app).
If your integration requires machine-to-machine access without user context, use the Client Credentials Flow instead.
How It Works
The application redirects the user to the CatalystOne Authorization Server for login.
The user authenticates with their CatalystOne credentials and grants consent (if required).
The Authorization Server returns an authorization code to the app’s registered redirect URI.
The application exchanges the authorization code (and PKCE verifier) for an access token (JWT) and, optionally, a refresh token.
The access token is then used to call CatalystOne APIs securely on behalf of the user.
Registering an App for Named User Authentication
To use the Authorization Code Flow, you must register your app in the Developer Portal.
Steps:
In the CatalystOne Developer Portal, navigate to App Registration.
Complete the required fields in the registration wizard:
App Name*: The display name shown on the consent screen during user login.
App Description: A short summary describing your app or integration.
Allowed Redirect URIs*: HTTPS URLs where the Authorization Server will send the authorization code after login. URIs must match exactly.
Client ID: A unique, system-generated identifier displayed after registration.
Generate Secret: Creates a client secret (for confidential clients such as backend services). The secret is shown only once—copy and store it securely.
⚠️ Important
The client secret is displayed only once. Store it securely (e.g., in a password vault or secret manager).
Redirect URIs must be valid and HTTPS.
Once generated, secrets cannot be retrieved again.
Authorization Code Flow (with PKCE)
PKCE Basics
PKCE (Proof Key for Code Exchange) strengthens the OAuth flow by preventing interception of authorization codes.
Users must generate a code_verifier and code_challenge using an external tool.
The server expects:
code_challenge = base64urlencode( sha256(code_verifier) )
Send:
Send code_challenge with the GET /authorize request
Send code_verifier (plain text) with the POST /token request
Prerequisites
Before starting the flow, ensure you have:
Client ID: {CLIENT_ID}
Client Secret (confidential clients only): {CLIENT_SECRET}
Redirect URI (must be registered): {REDIRECT_URI}
Scopes: {SCOPES} (e.g., openid profile)
State: {STATE} (random CSRF token)
PKCE values from your external tool: {CODE_VERIFIER} and {CODE_CHALLENGE} with code_challenge_method=S256
CatalystOne does not currently support public clients.
For authentication, include your client_id and client_secret in the Authorization: Basic <Base64Encoded(client_id:client_secret)> header.
Token Lifetimes
Authorization Code: 5 minutes
Access Token: 60 minutes
Refresh Token: 60 minutes
Preforming the flow
Step 1 — Authorize (GET) → Receive Code
GET https://api.catalystone.io/oauth2/authorize?response_type=code&client_id={CLIENT_ID}&state={STATE}&scope={SCOPES_URLENCODED}&redirect_uri={REDIRECT_URI_URLENCODED}&code_challenge={CODE_CHALLENGE}&code_challenge_method=S256
After login and consent, the user is redirected to: {REDIRECT_URI}?code={AUTH_CODE}&state={STATE}
cURL Example
curl --location 'https://api.catalystone.io/oauth2/authorize?response_type=code&client_id={CLIENT_ID}&state={STATE}&scope={SCOPES_URLENCODED}&redirect_uri={REDIRECT_URI_URLENCODED}&code_challenge={CODE_CHALLENGE}&code_challenge_method=S256' Step 2 — Exchange Code for Access Token
Endpoint
POST https://api.catalystone.io/oauth2/tokenContent-Type: application/x-www-form-urlencodedAuthorization: Basic base64({CLIENT_ID}:{CLIENT_SECRET})
Body
grant_type=authorization_codecode={AUTH_CODE}code_verifier={CODE_VERIFIER}redirect_uri={REDIRECT_URI}
cURL Example
curl --location 'https://api.catalystone.io/oauth2/token' \--header 'Content-Type: application/x-www-form-urlencoded' \--header 'Authorization: Basic {BASE64_CLIENTID_COLON_SECRET}' \--data-urlencode 'grant_type=authorization_code' \--data-urlencode 'code={AUTH_CODE}' \--data-urlencode 'code_verifier={CODE_VERIFIER}' \--data-urlencode 'redirect_uri={REDIRECT_URI}'
The code_verifier must be the same string used to generate the code_challenge.
Step 3 — Refresh Token
Endpoint
POST https://api.catalystone.io/oauth2/tokenContent-Type: application/x-www-form-urlencodedAuthorization: Basic base64({CLIENT_ID}:{CLIENT_SECRET})
Body
grant_type=refresh_token refresh_token={REFRESH_TOKEN}cURL Example
curl --location 'https://api.catalystone.io/oauth2/token' \--header 'Content-Type: application/x-www-form-urlencoded' \--header 'Authorization: Basic {BASE64_CLIENTID_COLON_SECRET}' \--data-urlencode 'grant_type=refresh_token' \--data-urlencode 'refresh_token={REFRESH_TOKEN}'
Scopes and Access Control
The scopes requested by the app determine which APIs it can access.
Each scope corresponds to a specific permission defined by a CatalystOne API.
Example scopes:
openid profileThe resulting access token includes:
The authenticated user’s identity (user claims).
The authorized scopes.
This ensures that API calls respect both application-level scopes and user-level permissions.
Troubleshooting
invalid_grant: Redirect URI mismatch, expired/reused code, or incorrect code_verifier.
invalid_client: Incorrect or missing client credentials.
invalid_request: Missing or improperly encoded parameters.
PKCE mismatch: The code_verifier doesn’t match the code_challenge.
Security Checklist
Always use HTTPS.
Never log secrets, codes, or tokens.
Validate and store state; compare it on return.
Limit scopes to least privilege.
Store refresh tokens securely; rotate on suspicion.
Keep PKCE S256 enabled for all apps that support it.